REVIEW · SYDNEY
Sydney Icons & Bondi Half Day Private Tour
Book on Viator →Operated by Cloud 9 Tours · Bookable on Viator
Sydney turns into a whole storybook in just half a day. This private tour stitches together the big icons and the scenic edges of the harbor, with a guide who can adjust the pace and focus to what you care about most. I like that you get a logical route from historic Sydney to postcard views, instead of playing hopscotch across town.
What I also like is the mix of classic photo stops (Harbour Bridge, Opera House, Mrs Macquarie’s Chair) and genuinely different scenery (Watsons Bay, The Gap, Bondi Beach). One thing to consider: with a 4-hour window and lots of worthwhile stops, you’ll want to keep your expectations realistic about time at each viewpoint—great for highlights, not built for deep museum-style wandering.
In This Review
- Key things you’ll love
- Why this Sydney icons-and-coast loop works in only 4 hours
- Pickup and pacing: getting out the door without losing your day
- The Rocks: convict-era Sydney before the big harbor photos
- Harbour Bridge and the selfie-ready photo break
- The CBD sweep: Queen Victoria Building and Macquarie Street architecture
- Opera House steps and Mrs Macquarie’s Chair: the skyline hits
- Watsons Bay and The Gap: coastal views with a little edge
- Bondi Beach at the end: time to slow down on your terms
- Price and value: what $650 per person buys you
- Who this private half-day tour suits best
- My practical booking advice
- FAQ
- FAQ
- How long is the Sydney Icons & Bondi private tour?
- Is this a private tour or a shared group?
- Do you provide pickup and drop-off?
- Can I choose a morning or afternoon departure?
- What sights are included in the route?
- Are admission tickets included?
- Is food included?
- What’s included for comfort on the tour?
- Does the tour operate in bad weather?
- What is the cancellation policy?
- What kind of ticket do I receive?
- Are service animals allowed?
Key things you’ll love
- Private guide, flexible route: You can tailor the tour to your interests instead of following a fixed script.
- All-weather operating mindset: The tour runs in all weather, so dressing for conditions matters.
- Icon stops with real payoff: Harbour Bridge, Opera House, Mrs Macquarie’s Chair, and Bondi are all built around photo views.
- Scenic coastal loop: Watsons Bay, The Gap, and Bondi give you a coastline story, not just city landmarks.
- Easy comfort setup: Late-model air-conditioned vehicle plus bottled water.
- Focused local storytelling: Expect friendly pacing with history talk that sticks (from guides like Greg and Chris).
Why this Sydney icons-and-coast loop works in only 4 hours
![]()
A half-day tour is best when it helps you get your bearings fast—and this one does. You start in The Rocks, then work your way toward the harbor’s most famous viewpoints, and finish with Bondi and the cliffs. That order makes sense because you see Sydney’s layers in a smooth flow, not as random stops.
You also get the advantage of a private guide. That matters when you want extra time for a specific photo angle, or when you’d rather trade a quick stop for more explanation at the next one. The tour is designed to be flexible, so it doesn’t feel like you’re being herded from sign to sign.
The other win is value for time. Even though the price is $650 per person, you’re paying for a dedicated guide, a late-model air-conditioned vehicle, bottled water, and a planned run of major sights with admission tickets marked as free at the stops listed.
You can also read our reviews of more private tours in Sydney


Pickup and pacing: getting out the door without losing your day
The biggest practical advantage here is the convenience: pickup and drop-off at a location of your choice. In Sydney, that can be the difference between enjoying your first hours and spending them on transport wrangling.
You’ll travel in a late-model air-conditioned vehicle, with bottled water included. That sounds like small stuff until you’re trying to fit several viewpoints into a short window—comfort keeps the tour from turning into a marathon.
There’s also an option for morning or afternoon departure. If you’re the type who wants softer light for photos, you’ll likely prefer one of the daylight runs over a rushed midday schedule. Either way, the key is that your guide can adapt the timing to what’s working in real life that day.
The Rocks: convict-era Sydney before the big harbor photos
![]()
The tour begins in The Rocks, where you’ll get a sense of Sydney’s convict history. This is one of the few areas where you can feel like you’re looking at the city’s earlier chapters without needing to hunt down every museum.
Your guide helps connect what you see to what it means. That’s the difference between walking through an old neighborhood and actually understanding why the streets matter. It’s also a great warm-up: you start with something historical and human-scale, then you shift to the grand views.
At this stop, admission is listed as free, and you get about 30 minutes. That’s enough time to orient yourself, take a few photos, and still keep momentum toward the harbor.
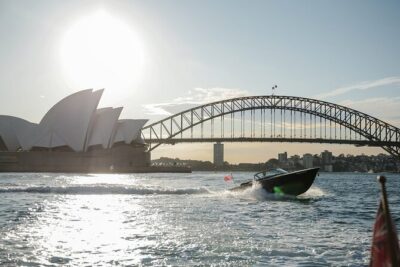
Harbour Bridge and the selfie-ready photo break
![]()
Next up is Sydney Harbour Bridge, one of those landmarks that can look slightly unreal in person. You get a short window—about 15 minutes—to take in the views and grab the photo moments you came for.
The practical value of this stop is that your guide sets you up for angles. Bridges are all about perspective, and without local help it’s easy to choose the wrong side of the street and spend ten minutes regretting it. With a dedicated guide, you spend that time photographing and learning.
Admission is listed as free here too, so you’re paying for the guide and the transport time, not ticket costs.
The CBD sweep: Queen Victoria Building and Macquarie Street architecture
![]()
Between the big harbor icons, you’ll get a stop for the historic buildings of Sydney’s CBD (downtown). Expect a focus on landmarks along Macquarie St, including the Queen Victoria Building and St Mary’s Cathedral, plus prominent government buildings nearby.
This part is valuable because it gives context for what you’re about to see. Sydney’s harbor views are dramatic, but the city’s institutions and architecture explain why the city shaped itself the way it did. You’re also getting a break from constant hill-and-coast walking.
The time at this specific stop isn’t listed, so keep in mind it’s likely a shorter look. If you’re the type who wants to step inside every building, you might still want to plan an extra standalone stop later—this tour is built for highlights rather than slow exploration.
- Blue Mountains Small-Group Tour from Sydney with Scenic World,Sydney Zoo & Ferry
★ 5.0 · 3,709 reviews


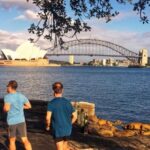
Opera House steps and Mrs Macquarie’s Chair: the skyline hits
![]()
Then comes the Sydney Opera House area, where you walk up the steps and take in those harbor views. It’s a classic “turn your head and look” stop, designed for the iconic views people travel for. Admission is listed as free here as well, and you get about 15 minutes.
This is a strong stop for first-time Sydney visitors because it gives you the silhouette and setting in one go. After this, you’re already seeing the harbor the way locals do—from the viewpoints that make the city feel cinematic.
After that, you’ll head to Mrs Macquarie’s Chair for amazing views. Expect another 15-minute stop focused on the photo angle and the broader harbor panorama. This is one of those viewpoints that makes Sydney’s geography feel personal, like the harbor is laid out for you.
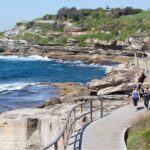
Watsons Bay and The Gap: coastal views with a little edge
![]()
From the Opera House area, the route shifts outward to the coast with Watsons Bay. You’ll enjoy a short coastal walk here for about 30 minutes, plus the time to take in the shoreline scenery.
This stop helps you see Sydney beyond the postcard core. You get a different texture—open water, a change in atmosphere, and a sense of how the harbor connects to the broader coastline.
Next is The Gap Park, where you visit the sandstone cliffs at the entrance to Sydney Harbour. You’ll have about 20 minutes for a short walk, with the whole mood of the tour turning more rugged and wind-in-your-face (use whatever you normally wear for the weather you’re handed). Admission is listed as free, and this stop is pure payoff for anyone who loves dramatic ocean scenery.
Bondi Beach at the end: time to slow down on your terms
![]()
The last major stop is Bondi Beach, with about 30 minutes to enjoy the beach area. This is where the tour becomes less about big landmarks and more about letting the city sink in. You can dip your toes, take a walk, and enjoy Bondi at street level.
A nice thing about ending with Bondi is that it gives you a simple reset. If you started the morning with history and architectural stops, Bondi is a natural transition to relaxed time and casual sightseeing.
Food and drinks aren’t included, so you’ll want to plan your own quick snack or coffee if you’re hungry. The tour works best if you use Bondi time as your final unwind before heading back.
Price and value: what $650 per person buys you
![]()
Let’s talk money honestly. At $650 per person, this is not a budget tour. But it can be good value if you’re paying for convenience, a private guide, and a tight route through multiple signature locations.
Here’s what your money covers:
- A dedicated private guide and storytelling at each stop
- Pickup and drop-off at a location of your choice
- A late-model air-conditioned vehicle plus bottled water
- A flexible route that can be adjusted to your interests
- Admission ticket listings marked as free at the stops included
You’re also not buying into a long ticket chain. Many major sights are covered as free at this set of viewpoints, which helps your overall cost feel less “nickel-and-dimed.”
If you’re traveling with others, check whether the group discount applies in your situation. Private tours often feel more sensible when you’re sharing the fixed costs—especially in a city where transport and guide time can add up.
Who this private half-day tour suits best
This tour fits best if you:
- Want a first taste of Sydney and need the major icons handled efficiently
- Prefer a private guide who can explain and adjust rather than follow a fixed group pace
- Love photo stops with strong viewpoints, from Harbour Bridge to Mrs Macquarie’s Chair
- Want both city architecture and coastal scenery in one run
It’s also a smart choice if you’re short on time but still want a guided route that makes sense. If you’re the kind of traveler who wants to spend hours inside buildings or linger at one spot for a full afternoon, you may feel slightly rushed. This is made for seeing a lot, not for deep, slow browsing.
My practical booking advice
If your goal is a clean introduction to Sydney—history in The Rocks, icons at the Opera House and Bridge, and coastline energy at Watsons Bay, The Gap, and Bondi—this tour is an excellent match. The strongest part is the combination of private guiding plus a well-built sequence of highlights that you can actually enjoy in just half a day.
Before you book, think about what kind of traveler you are:
- If you want structure and explanation, you’ll likely love it.
- If you want long, unscheduled wandering, you’ll probably prefer adding extra independent time after the tour.
FAQ
FAQ
How long is the Sydney Icons & Bondi private tour?
It’s about 4 hours.
Is this a private tour or a shared group?
It’s a private tour. Only your group participates.
Do you provide pickup and drop-off?
Yes. Pickup and drop-off are offered at a location of your choice.
Can I choose a morning or afternoon departure?
Yes, morning or afternoon departure is available.
What sights are included in the route?
You’ll visit The Rocks, Sydney Harbour Bridge, historic CBD buildings along Macquarie Street (including Queen Victoria Building and St Mary’s Cathedral), Sydney Opera House, Mrs Macquarie’s Chair, Watsons Bay, The Gap Park, and Bondi Beach.
Are admission tickets included?
Admission tickets are listed as free for the stops in the tour.
Is food included?
No. Food and drinks are not included.
What’s included for comfort on the tour?
You get a late-model air-conditioned vehicle, bottled water, and a local private guide.
Does the tour operate in bad weather?
Yes. It operates in all weather conditions, so dress appropriately.
What is the cancellation policy?
You can cancel for free up to 24 hours in advance for a full refund.
What kind of ticket do I receive?
You receive a mobile ticket.
Are service animals allowed?
Yes, service animals are allowed.
You Might Also Enjoy

More Private Tours in Sydney

More Tours in Sydney
- Blue Mountains Small-Group Tour from Sydney with Scenic World,Sydney Zoo & Ferry
★ 5.0 · 3,709 reviews


More Tour Reviews in Sydney
- Blue Mountains Small-Group Tour from Sydney with Scenic World,Sydney Zoo & Ferry
★ 5.0 · 3,709 reviews